


Did you know that mason bees are the primary pollinators of fruit trees in the Portland area? It's true! These solitary nesting bees are native to our area, and they fly in cold, wet conditions when other species stay home, making them vital pollinators for all sorts of early-blooming flowering plants. You can even host these gentle, blue-green bees in your own backyard!
Keeping mason bees is an inexpensive and fun way to get started with beekeeping — especially if you have fruit trees on your property — but it does come with a few responsibilities. Since you are hosting them in the same spot every year, you will need to protect them from harm.

Setting up a Mason Bee House

At Cornell Farm, we have all the supplies you need to keep mason bees successfully, starting with cocoons, which generally arrive during the month of February a few weeks before the bees emerge. These should be placed in a specially-made house that your bees will use to nest. It’s important that the bee house has an overhanging roof to keep your bees from getting wet in the rain, and the tubes placed inside are around .3 inches (8mm) in diameter and at least 6 inches deep like the ones we have at the Farm. If your house doesn't come with them already, fill the main compartment of the house with as many of these cardboard tubes or hollow reeds as will fit, being sure to leave the top portion — the “attic” — clear of tubes so that you have somewhere to place the cocoons before they hatch.
It's a good idea to hang the house securely against a fence or building, well off the ground where it will be easy for you to see the bees coming and going. You will also want it to be somewhere easily accessible so that you can collect and replace the tubes later in the year. An east-facing location is the best, but a south-facing exposure will work if it affords your bee house protection from the hot afternoon sun. The bees will want to warm up first thing in the morning, so that morning sunshine will help get them going.
If you are starting with purchased cocoons, put those in the attic of the bee house as soon as temperatures start to warm up in spring. Mason bees will start to emerge once the air temperature reaches 55°F for a few days in a row. (Watch for fruit trees blooming.) You may want to stack rocks or pine cones in front of the cocoons in the attic to keep the bees safe from predators.
Habitat
These bees will only fly a maximum of about 300 ft from the nest. Therefore, it’s important to have many flowers blooming during the time of year that they fly (roughly March to June.)
Make sure that there is some moist, open clay soil available to the bees as close to their house as possible. They are called “mason bees,” because they use mud to build walls between individual egg chambers.

Life Cycle
There is one generation of Mason Bees raised every year. If you are starting with cocoons, those will hatch and the bees will find the tubes you provided right away. The males and females will mate right away, after which the females will start collecting pollen and laying eggs in the tubes if you have the right resources in your garden.
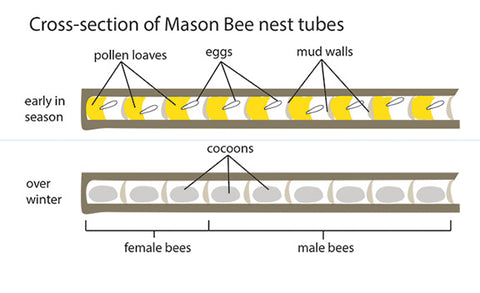
If there is enough mud, nectar, and pollen available the bees will stay and build their nests in your tubes. Females will start by collecting pollen, making a pollen loaf, laying an egg on it, and then building a wall of mud. They will repeat this process until the entire tube is filled so that each baby bee will have its own chamber. Female bees will be deeper in the hole, males will be laid closer to the outside. (Make sure your tubes are at least six inches deep so you are sure to get female bees.)
After about a week, the egg will hatch and the larva will start to eat the pollen. After around 10 days the larva will have eaten enough food. They will spin a cocoon and start changing into full-grown bees. This transformation takes until the end of summer, but the bees will stay in their cocoons until the next spring.
Beekeeper Tasks

Keep an eye on your bees all season, making sure no birds or other predators are intruding.
If predators become an issue, you might want to try installing one quarter inch hardware cloth over the face of the house. This will allow bees to go in and out while also protecting them. (Make sure you will still be able to get the tubes out at the end of the season too!)
In October, start collecting your tubes of bees for safe storage over winter. Create a small work station where you can open the tubes and look through which cocoons are viable.
Throw away any dead larva that did not spin a cocoon, they will look like half-moon shaped grubs. Throw out any cocoons that have holes in them (this is a sign of wasp intrusion). Separate out the cocoons that look healthy. They will be light grey and oblong.
Once you have all your healthy cocoons in one place, shine a flashlight into each one to make sure there is a bee inside, not a beetle. There’s a type of beetle that will take the place of bees and you do not want to let them into storage.
Mason Bee cocoons are water-tight, so you can swish them in water (50 degrees or less so they don’t wake up!) to make sure they are clean going into storage. Air dry on a paper towel for 10 minutes.
Keep them in a container in your refrigerator over winter. Make sure it is not air-tight, they need to breathe, and add a bit of moisture every couple of weeks so they do not dry out. You can use a damp paper towel or piece of sponge to hold the moisture.
Come spring, put out fresh cardboard tubes in your Mason Bee house and place your cocoons in the attic. Your bees are ready for another year!
We’ve got Mason Bee nesting materials, houses, books about habitat, and cocoons to get you started and keep you supplied year after year.

Leave a comment